Menu


In the following article we cover these steps in details and provide a practical walkthrough for getting started with your new Looker Studio Template.
After purchasing a Google Looker Studio Template you will receive a link to access your file. This link will appear immediately on the checkout page and it will also be sent to your email address.
This link will allow you to open a copyable version of your file that is your forever. Below are the steps.
Open the link you received after purchase (it’s also sent to your email).
Navigate to the top of the screen, where a menu bar will appear. For some templates the menu bar is hidden by default (as part of the design). In this case when you move your mouse to the top of the screen this bar will appear (drop down). On this bar click the three dots and then click ‘make a copy‘.

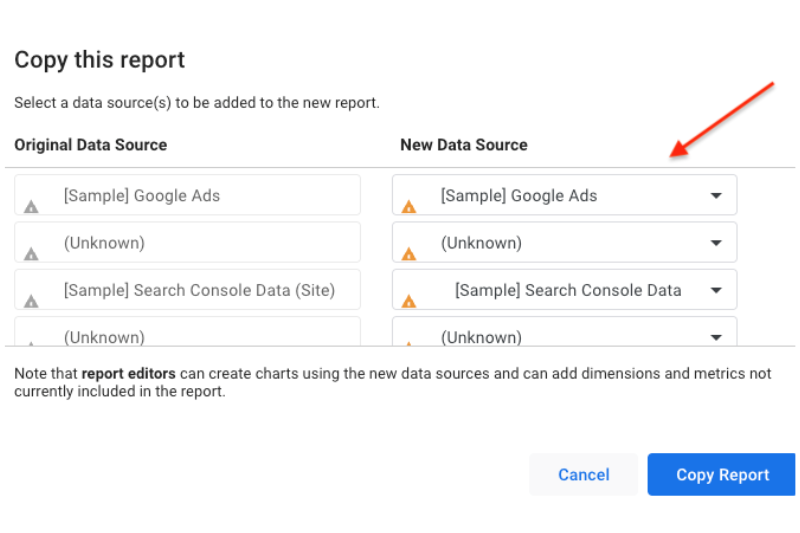
You will now be prompted to connect to new data sources. This is the moment when you connect the dashboard to your own data. sources. The template will show you the original data sources, which are the data sources the template was set up with, as well as the ‘New Data Source’. This is where you input your own data source. For templates that connect to multiple data sources, you will have multiple rows, where each row is a different data source. It is important to match up the right data sources.
When adding new data sources, if they are already connected to your Google Ads account, then you can simply select them from the drop down. But if you have not previously connected them before, you will be prompted to connect them and be taken to a new screen.
For example If the original field was a Google Ads data source, then you need to ensure the ‘new field’ connects to a new Google Ads data source. If you do not have a Google Ads account connected to the Google Account you are logged in on, then you will need to connect Google Ads to your Google Account
The last step after connecting all your accounts is to click the blue button ‘copy report’.
You will now be presented with your new report. This is a copied version and is now your own version with your own data sources connected.
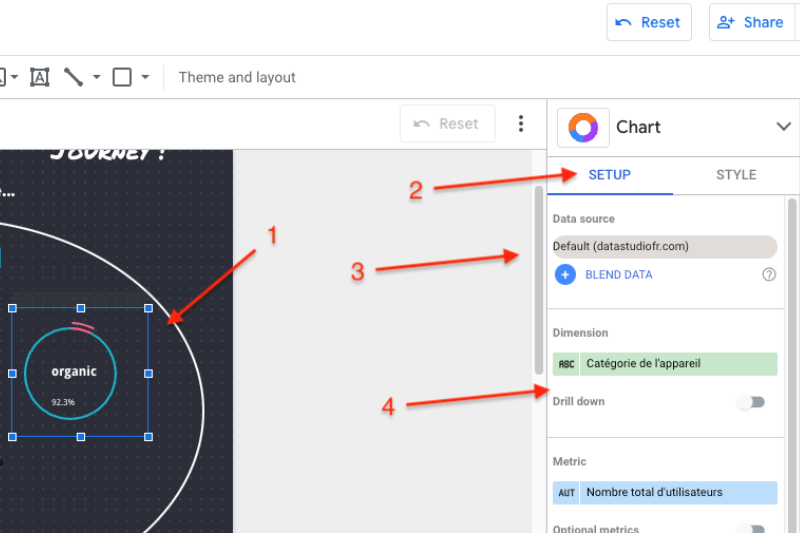
You now should review the dashboard for any errors or missing data. Errors are common and can occur for multiple reasons. The good news is that they are easily resolved in most cases. Select the graph or element that contains the error (1), open the sidebar and select setup (2), in this sidebar you must review that this graph is connecting to the right data source (3) and the right dimensions and metrics (4)
After reviewing all of the errors and metrics the last step is to switch out of ‘edit’ mode to ‘view’ mode, using the blue button in the right hand corner and then share the template with your stakeholders.
The share button is located next to the ‘view/edit’ button and includes a number of great options for sharing either via a link or PDF. Users can be given different levels of view or edit access depending on your preference.
Looking for some great templates to get started with? Check out the best eCommerce Looker Studio templates for 2024 for some great suggestions.If you want to expand your Looker Studio skills take a look at our Ultimate Guide Article for awesome tips and tricks.